10.21.2019

Project CBR600F: Holding water!

On Saturday, it took some time to tackle the coolant leaks. I managed to drain the radiator without making a total mess but what did come out and make it into my bucket was pretty damn gross.  I think this bike has been sitting much longer than the previous owner was led to believe.  Looks like I may need to do a few frequent fluid changes for the coolant, brake fluids and engine oil.


Who likes dark roast radiator fluid?

I replaced the thin factory o-ring on the thermostatic switch with a beefier one and so far, she's holding water.  I replaced the lower hose clamp as there was a slight weep from the hose.  

In other news, my step father has returned from Japan and I am now the proud owner of a real JIS screwdriver.  No more stripped "philips" screws for me. 


I still need to leak test the carbs and fix the slight oil leak at the gen cover.  Making progress.

10.14.2019

Project CBR600F: The Cure for Leaky Bowl Syndrome

A few weeks ago, I ordered a set of carb kits from eBay.  They came here via the slow boat from Taiwan (they also came with an extra float needle).  While my family was occupied, I brought in the carb bank and started gutting them.


Festive!

The job was easy and I'm glad I got the kit, not just the gaskets as several of the float valves were in rough shape and barely finger tight; a few jets were the same. Speaking of tight, I may have over tightened one of the bowl screws and pulled the threads out.  Aluminium threads vs steel bolts.  I managed to find a longer bolt that I made work.  Man, this thing is gonna be a total patch work.


There it is.  Like a sore thumb.


I hope to be able to leak test them this weekend and maybe do a test start.  Well, after I drain the radiator and fix that leak.  I'm hitting the BMV this week to get the title processed.  The bike won't run, but at least it's mine.

Project CBR needs to be fully ironed out and road worthy because I'm planning a trip next fall.  If I hit any major road blocks before then, I might have to track down a newer bike and screw up my expenses by buying something that isn't a total basket case.

I sure would like a DR650se or even a CB500x, either would be a fine addition to the garage.  Not that I'm shopping or anything...

Stay safe out there.

9.10.2019

Project CBR600F: The Leaks That Wouldn't Die!

With the fuel supply o-ring replaced (Harbor Freight metric o-rings!) and carb bank reassembled, I hooked up my fancy new test tank, turned that valve and....


Shit. 


It's weird that the other bowls didn't leak before but perhaps they weren't getting enough fuel due to the leak at the fuel supply T.  So, having had enough of putting carbs on bikes, finding leaks, pulling them, fixing and repeating the process, I made this: 


Now I can leak test and test the float levels more accurately. All without dealing with gasoline all over my bike.  Hooray!

Time to find some bowl gaskets and try again.  I did replace the petcock with one a scored from Amazon, it's like it was made for it, which it was!

In happier news, I did use some starting fluid and get to hear the bike fire up.  That exhaust is mighty loud and raspy.  Sounds good though.

8.11.2019

Project CBR600F: Revenge of the Leaks!

The afternoon started out like this:


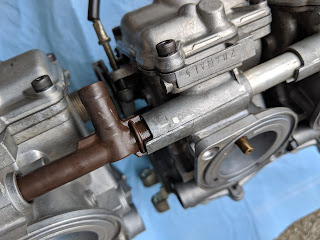
My excitement was short-lived.  The petcock is leaking pretty badly, as well as the fuel joint tube between carbs 2 and 3.  Breaking them apart requires replacing a whole lot of o-rings crafted from Honda's finest unobtainium.  Initially, I thought it was bowl on carb 2 but once I pulled them, I saw the proof. 


In happier news, there are no more coolant leaks (yet).  But my RTV gasket has a slight weep.  Right now, that's the least of my worries. 


The afternoon ended up like this:


8.10.2019

Project CBR600F: Plug it up!

After hitting multiple auto parts stores, I managed to track down some suitable heater hose to replace the stock unit.  It doesn't have any fancy bends and looks like I stole some garden hose for the job but it fits and is heavier duty than stock. 


During my scouring of the net for other options, I found transparent heater hose in the appropriate size.  I may have to give that a shot.  It might look pretty cool until the coolant gets nasty but that would be a good indicator. 

Once that leak was resolved, I moved on to the pulse generator cover.  Scraping gaskets is half relaxing zen like work and the rest frustration and sliced fingers.  I managed to get the cover and case mating surfaces cleaned up and ready.  I leaned the bike onto its right side to keep oil from seeping out and ruining my RTV gasket.


However, trouble came when I tried to put the two clean surfaces together.  There is a hollow tube set in the middle of the upper gear that would not slide in enough for the cover to go back on.  Of course, this caused me to smear my nice bead.  I had to stand the bike back up and give the tube and gears a good jiggle to get it back in properly.  Then it was back to cleaning the case and mounting the cover.  Thankfully, it went on without issue.  My 60 minute timer is set and once it's ready, I'll torque down the bolts.


With the cover on, it was time to move on to the coolant intake o-ring.  This was a pretty simple fix. Slide it over the tube, wiggle the tube into place and tighten the bolt.  Being so easy, I'm sure this is the one fix that will still need some fixing. 


With all the leaks "fixed", I'm waiting for the 24 hour timer to expire so I can put the bike back on its side stand, top off the oil, fill the coolant and mount the tank. If no fluids are leaking, I can hit that magic red button.


7.29.2019

Project CBR600F: Code Name LOL (Lots of Leaks)

Armed with jugs of oil, coolant, fresh gasoline and an inexpensive gel battery from Amazon, I was excited and slightly nervous about pressing the go button.

Battery installed!  Key turned!  Rear brake light check, good!  Front brake light check, uh-oh.  Right, we'll fix that later.  I pulled the tank, popped the radiator cap and started filling it with tasty coolant.  When I went to give the hoses a squeeze to help burp the system, I heard *drip* *drip* *drip*.  Oh no.  I spotted 3 coolant leaks.


That's one crunchy o-ring in there.


Loose hose clamp

(not pictured)

Bottom rad hose with a small slit.

Ok, well, I was expecting leaks just not from those places.  While I was out there, I might as well fill the oil.  The K&N filter looks new and the existing oil not too shabby, so I topped it off. I returned to the house for some snacks and to track down the o-rings and hoses. 

I returned later to tackle that brake light issue.  I removed the switch and disassembled it.  It looked good and tested fine.  The wires were good, I completed the circuit and the brake light came on.  Hmmm.  I cleaned up the contacts and reinstalled the switch.  Much success!  

But wait.... why is that bowl I'm using to catch coolant so dark?  


That almost looks like...oil.  Oh no. Immediately my brain goes into panic mode!  Oil in the coolant! The end is near! But wait...that's not possible.  I didn't test start the bike, it has to be leaking from somewhere.  


Yup. Another leak.

This time, it was from the pulse generator cover.  That gasket is made from unobtainium, so I'll be rocking the ULTRA BLACK RTV gasket.  Whatever works.  

So, a few steps forward, a few back.  More reasons why I prefer air-cooled bikes.  The o-rings are on order and I'll have to figure out a universal application for the rad hose, thankfully it's not to fancy with bends. 

Stay tuned! We'll get to that magical first start eventually.

7.15.2019

Project CBR600F: Revenge of the JIS!

One challenge of working on older Japanese bikes is the multitude of stripped out "phillips" screws that have fallen victim to our SAE screwdrivers.  In the past, I've replaced these with allen had screws and made my life and any future owner's lives easier.  Once those were replaced, I put on the airbox and started my plan for hiding all the extra wiring. 


JIS vs SAE phillips screwdriver. 


Shiny! 


Easier to service and stronger hardware. 


This is not normally to be used as lube, but this time it is. 


Using the sanitizer, the carbs went in without issue.


Clean-ish K&N.


I sacrificed an intake tube so I can bury the extra wiring. 


Temp location for the fuse block, not weather friendly.


I need a battery, oil and coolant, then I can test start!

7.01.2019

Project CBR600F: Valve Service

Friday night, I managed to tackle the valve service.  The intake valves were all too tight, while the exhaust were mostly within spec. Even with the custom tool, it was still a challenge on cylinders 1 and 4.  With a little help from my coworker who used to race a Hurricane, I got the throttle cables routed correctly (mostly) and the choke cable installed.  However looking back in my notes, I noticed I did not check the float height.  A quick visit to Revzilla and a float tool is on it's way.  With the carbs cleaned, jets checked and pilot screws set to stock, I didn't want to skip the floats and end up needing to tear it down again.


Screw and lock nut adjusters make adjustments easier but more frequent. 


I may etch these into the frame and use some paint to highlight them.


Push me! Pull you! 


I still have this rat's nest to deal with. 


6.19.2019

Project CBR600F: Controls and Clearances

Getting a little closer every week!

I have the heated grip elements and new grips installed, as well as a shiny new clutch lever and functional front brakes! The ProGrip 714s should tame some of the engines buzz through the bars.


 Before I could go any farther on reassembly, I needed to do the valve service.  I pulled the radiator, dropped the newly positioned oil cooler and removed the plug wires.  Once the area was cleared, I could easily get to the valve cover and remove the bolts.  My excitement quickly turned to frustration when I learned the valve adjuster tool I ordered was not even close to the correct one.  I even tried the valve adjuster from when I had a Honda Element, sadly, while the socket was the correct size, the tool itself was too large.   This stopped me dead in my tracks.  I stuffed shop towels in the plug holes and put the valve cover back on.

Some brief Googling turned up that the original tool is worth a good amount.  I found some crafty souls had ground down the sides of sockets so they could hold it with a wrench and put a screwdriver down the middle.  Someone else welded a handle on to a socket.  That's it!  With a quick message I had a friend willing to make my custom valve tool.


It's not perfect but it doesn't have to stand up to a high torque value, just the locknuts on the valve adjusters.  I won't have more garage time for another week or so but I should be able to knock out the valve service quickly and get on to installing the carbs and etc.