LS2 Pioneer Review
**UPDATE**
Click here for the post covering the SENA SMH5 installation.
I've been lusting after a dual sport helmet ever since I saw the Simpson GS-3 MX. I loved the styling, the large field of view and the air flow. However, I didn't buy one due to terrible reviews. When I got my Ulysses, I started shopping for a dual sport lid again. Unfortunately, I wasn't able to find one that offered multiple shell sizes, fit for a long oval head and priced under $300. When
LS2 offered me a chance to review their new dual sport helmet, I was ecstatic to learn that not only did it meet the above requirements, it is also DOT / ECE rated and has a whole laundry list of other great features.
First, a little background on the fastest growing helmet company you've probably never heard of.
LS2 has been manufacturing helmets for several large companies for 8 years. They are the #1 selling helmet company in Spain (their home country), #2 in Italy and #3 in France. In addition to having a Moto GP Team, they have been worn by winners of the Dakar (3 quad riders and 2 motorcycle). Their moto is "Best product for the price and the best price for the product.", and if the rest of their products are like the Pioneer, they are sticking to that motto.
LS2 is factory owned, with production done in a factory north of Hong Kong. The location features a full test lab covering all the major certifications: DOT, SNELL, ECE plus Japanese and Australian certs. After a helmet is created, samples are sent to
Southwest Research for independent testing and verification, the results of those tests can be found on the LS2
website.
Let's get down to the meat and potatoes of the Pioneer!
Shell
Made from a proprietary blend, called KPA (Kinetic Polymer Alloy) it keeps the helmet light but delivers low penetration rate and allows the shell to flex in order to assist with energy absorption. The Pioneer is produced in three shell sizes. As I mentioned in my review of the
Icon Airmada, finding a helmet that offers multiple shell sizes is a priority of mine. The less weight on your neck, the safer you are.
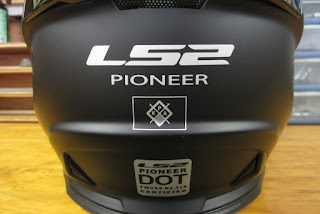
The Pioneer comes in two color schemes, Solid and Trigger. I was torn between the Hi Viz Trigger and Matte Black. Black, especially matte black, being the fastest color, won.
The peak blocks a great amount of sunlight and has minimal drag, even at highway speeds on my naked bike. The drag is decreased by having large cut-outs on the peak. It is removable but I think the benefits far outweigh a little drag. You can adjust its placement up and down by about 5mm each direction. If you push it all the way down (forward?) it does contact the visor when it is raised.
There are 5 vents built into the shell: 1x chin vent (close-able), 2x top vents and 2x side vents. They flow a massive amount of air and funnel it out via 2x exhaust ports on the backside.
Visor(s)
The visor gives you a huge field of vision and is UV, fog and scratch resistant. Most of my commutes have been in temps ranging from 40 to 80 degrees, thanks to all the airflow, fog has not been a problem. When shopping for dual sport helmets in the past, the visors all seemed to have some distortion due to the curve of the shield. The Pioneer is distortion free and seems to be 100% optically correct. It's easy to clean and the removal process, while not as fast as most street helmets, is simple. Unscrew the side screws, remove the peak and visor. Assembly is the reverse.
The Pioneer features a drop down internal tinted visor that is operated via slider on the left side of the helmet. Some helmets use a clunky linkage or spring system to operate their visors, the Pioneer uses a cable. Due to the peak blocking a good amount of sunlight, I haven't really needed to use the internal shield very often. When I have used it, it has worked well and is easy to operate.
I tested a set of goggles and they fit perfectly. The goggles fit properly within the eyeport of the helmet, the visor closes over the strap without issue. The strap sits securely between the exhaust port and a raised section above the DOT tag.
Internals
The Pioneer uses a multi-density EPS that is channeled to help air flow. The liner is hypoallergenic, removable, washable, breathable and does a good job at wicking away sweat. The liner features a recessed portion for glasses. I wear "vintage" style glasses with thick arms and they fit well without being pressed into my head.
The cheek pads are laser cut from a solid piece of foam and feel much nicer than the standard pieced together cheek pads in most helmets. Another feature of the cheek pads is the quick removal loops on the bottom. If you are ever in a crash, EMS workers can pull straight down/out to remove the pads and then remove your helmet with a greatly lower chance of compromising your c-spine. This really should be an industry standard in all helmets. I spent a brief time as an EMT and removing a helmet from an injured person is no easy task.
Instead of the standard D-ring buckle system, the Pioneer uses a ratcheting buckle system with a quick release tab. It is DOT approved and a time saver, especially if you need to adjust/remove your helmet while wearing your gloves.
Fit and Comfort
I wear an XS in every helmet I've ever owned. I prefer my helmets to be tight, on the verge of uncomfortable. The Pioneer seems to run a bit big. Not unsafe but just a bit looser than I like. This is easily solved by wearing a Buff or other type of balaclava which I do on about 90% of my rides anyway. The internal shape is a long oval style and fits great with no hot spots or pressure points. The wind noise isn't bad, with ear plugs it's just a bit louder than my other full face helmets. As I mentioned before, the peak does cause some drag at highway speed but it's not terrible, even without a fairing. It's only really noticeable during head-checks but it's not enough to jerk your head back.
Quality
For a helmet that falls in the sub $150 price range, I was truly amazed at the overall build quality and features that are packed into this lid. The vents all work well, the chin vent opens and closes smoothly. The visor latches closed securely, there no mid position notches, it's held in place by friction. I've found no issues or "quirks". Using black EPS would be a good touch (maybe there is a reason why it's white?). Overall, the quality is outstanding.
Final Thoughts
My ICON Airmada was my go-to helmet but I've been grabbing the Pioneer instead. It delivered features and quality far above my expectations, especially for the price. Besides the slightly loose fit, I have found no negative points to this helmet.


