10.29.2020

Project CBR600F: Who does Number 2 work for?

 After getting the swingarm and chain replaced, I couldn't resist the call of the road and the beautiful autumn day.  Regardless of the wet leaves, it's one of my favorite seasons for riding.  I gathered up my gear, pushed the bike into the drive way, turned the petcock to ON and waited for the bowls to fill.  Instead of a roaring inline four, I was given this:


More fuggin leaks. Seriously?  After FULLY rebuilding the carbs, even the spendy Honda interconnecting o-rings.  It ran great, with no leaks back in May.  Unfortunately, I didn't put lines on the overflow tubes so I had no clue where the fuel was coming from and I didn't have any more fuel line. So, I pulled the tank, and put on the test tank.  The leak stopped.  WTH? Possible a stuck float, but I'm not counting it as fixed yet.  One thing I did notice was pipe #2 was not hot, hmmmm.  Along with a lack of fuel line, I also had no spare plugs to test.  Come to think of it, did I replace the plugs previously?  

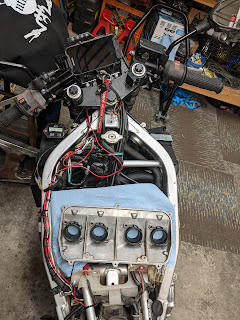
Getting tired of seeing my bike like this...

Nope, I did not replace the plugs.  Now, I have a spare plug to use while checking spark (better than jamming a test light in there and jumping the ground). All 4 plugs have been swapped and the floats have been checked (again). I did add overflow tubes (with labels) so I can figure out which side is leaking without pulling the airbox. 

Should be able to squeeze in a leak test this weekend. If the leaks continue, I'll swap out the floats (and or float valves) from the donor set of carbs.  They were rebuilt many moons ago by my coworker who used to race a CBR600F in WERA.  The rubber is probably long gone but hard parts should still be viable.  While still frustrating, I'm still managing to find enjoyment in the work, which is a big change from the past. 

10.27.2020

Project CBR600F: Temp Check

I received my Trail Tech TTO surface mount temp sensor in the mail and decided to knock it out quickly before calling it a night. Installation couldn't be much easier (although it was messy). 

1. Cut the top coolant hose
2. Install the sending unit, tighten hose clamps
3. Stick/screw mount the unit
4. Set the time and your high temp alert
5. You're done!

With that installed, my gauge "cluster" is complete! I love the contrast between the agricultural tach and the high tech speed/nav application on the Android phone. 

10.19.2020

Project CBR600F: Swingin' Cycles

 One of the many previous owners of the Hurricane somehow managed to dent the left side of the swingarm, right along the tensioner slide.  To make matters worse, instead of fixing/replacing the swingarm, they cut the chain a few links short to compensate!  


I ordered a replacement from a junkyard earlier this year and installed some ring mounts on the crossmember above my garage to hang the bike from.  I used the same method on my XJ to replace the fork seals. While it's obviously not as stable as an actual bike stand but it gets the job done.  


The replacement process is simple, unbolt, remove, regrease, replace, torque to spec.  Easy peasy.  I went fancy with my chain and chose the gold plates, classy.  However, my chain didn't include the rivet style master link.  Which is ok because I don't have the rivet tool.  Thankfully, I did have a clip style master link in my parts bin.  Got the chain cut to length (55 plates x 2 = 110 links)


I did manage to get out on a test ride (after a mysterious fuel leak, probably a stuck float) and found out cylinder 2 isn't firing.  I'm going to start with new plugs in all cylinders, I don't recall changing them previously.  If that doesn't resolve it, time to check fuel and compression.  From the test ride, I did learn that I really don't like low clip-ons.  I found a set with 1" of rise, they'll be here this week; however I'll probably swap them out for actual bars. 


stay safe out there.... 

10.16.2020

Project CBR600F: Facial Reconstruction Part 1

The Hurricane came to me essentially faceless, wearing only a sub frame and busted gauge cluster.  With my Android Dash in place, I needed to come up with a lighting solution and weather protection.  I browsed Amazon for some aftermarket LED options, initially settling on a round 7" LED headlight, complete with fork mounts and bucket.  However, I picked a vintage Lockhart windscreen and decided it wouldn't look right with a round headlight.  


I bet you can feel the 80's vibe through your screen right now.

The windscreen normally attaches to the sub frame but that has been tossed to the scrap heap, so I'll be fabbing my own mounts.  Speaking of mounts, fork mounts, or "ears" as some call them, can set you back a healthy bit of dough.  During my XJ Naked Conversion, I made ears out of an old road sign.  It cost me about $10 total, including the hardware; so I decided to go that route again.  

The other reason for dumping the round headlight is that I've always loved the face of the Ulysses XB12X that I used to own.  So, I found a set of dual LED fog lights (spot / flood combo) and a pit bike super moto fender.  Time to get to work! 

My inspiration.


The forks are roughly 8" apart, so I want to keep the headlights spaced to avoid an "eyes too close together" look.  Adding in a 1/4" on each side for the ears and windshield mounts should put it right about perfect.  I'll need to source some sort of metal (preferably aluminium) spacer for the center. The lights will be mounted together with some lock nuts and all thread.  This should allow me some play to adjust the lights up and down as needed.  These things are incredibly bright for their size, hopefully they have a good life span. 


Finding an aluminum spacer proved to be difficult, so I tried a few different approaches using coupler nuts but eventually settled on just using the mount that came with the lights.  This allowed me to mount the super moto fender nice and high.  It's more for aesthetics but it will give some protection from tire spray. 


I'm getting a real cyborg Gonzo vibe (as in the Muppets). 

Next, it was time to start mocking up the fork ears.  First draft is ok but I failed to take into account the rubber edging I would be using on the base material.  I should be able to cut them both from a single sheet of aluminum mesh.  


Mk1 ready for drilling!


Fancy JDM fender washers! Going to use these for the ear and side panel mounts.


The fork ear design may get a second shape but it works for now.  

The first round of mock-ups is looking good.  Nothing is lined up or mounted properly but I'm liking it. 


Next up is fabbing the mounts for the windscreen and buttoning it all up. 

8.17.2020

SENA SMH-5 Headphones Mod

 I've been using a pair of Sena SMH5 headsets since 2013, with a set of the "upgraded" speakers.  Around town and on bikes with a decent fairing, the audio is pretty good. However, on a naked bike,  or on the highway, the wind noise can easily overpower the intercom audio.  With that being the only real down side to these units, I didn't want to drop the change on a newer unit.   I saw some ear buds that are also noise blocking earplugs, so started researching adding an audio out for the SMH5.  There are factory cables and bases for the SMH10 but little to no support for the 5.   There is a company that will modify your unit for about $40 but I like my DIY projects. 

A quick search on Amazon and I found these 3.5mm screw terminals for about $8 per 2 pack.  With the parts in hand, and some time to tinker, I had them done in about 10 min.  The speaker wires are thin, really thin.  So be careful stripping the shielding away.  I used a razor blade and my thumb.  You'll know when you're pressing too hard, either you cut through the wire or your skin.  


Much success!  I tested them with cheap set of headphones and they sounded terrible.  PANIC MODE! But wait, let's test with nicer headphones.  Much better.  Now, I need to find a way to mount (probably hot glue gun) this to my helmet and seal it up against the elements.   I'm looking forward to testing it out after I order the plugphones

7.20.2020

Project CBR600F: Red Lights and Flashers

My Amazon multi-function signals arrived and I made a trek to Tractor Supply Company to get an oval LED tail light and mount. I want everything to be LED to help conserve what little output the Hurricane's electrical system can pump out.  I originally shopped the net for an LED tail light but so many are not DOT approved and have bad reviews.  I'd really prefer to not have a dim, essentially useless tail light.  On AdvRider, I saw a KLR build where the guy used two oval trailer in a V formation and it gave me the inspiration for this project. 


The signals even came with a set of resistors.


As I mentioned, these are multi-function, tail or brake, and signal. I opted for signal and brake light as I'm not sure on the laws regarding red running lights on a motorcycle and I don't want them to distract from the actual brake light. I read some place that brake lights in a triangle formation are more attention grabbing, so yeah. 


Lookin' good from the rear.


The LED flasher module I need from SuperBrightLEDs is on back order, so I stopped by CycleGear and grabbed one from SpeedMetal.  After I purchased it, I noticed it was "specific" for you Yamaha.


You're not the boss of me sticker! I'm putting this on a Honda.


I was unsure if it would work since my OEM flasher has three wires.  The kind associate at CycleGear assured me I could return it if it didn't work.  Thankfully, it worked just fine! The OEM version has a dedicated ground, while the LED uses the ground from the light circuit. 


Overall, I'm really happy with how well this all turned out.  Everything fit just right and the wiring was simple. The running light is very bright and the combination of the brake light and brake function of the signals is very bright. In the future, I may add a tail light strobe like I put on my Ulysses. 

7.17.2020

Project CBR600F: Shining Light of Neutrality

With my custom dash in place and wired, I noticed two warning lights did not work, neutral and oil.  After some quick Googling, I found the common culprit is the neutral switch, located on the lower left side of the bike, just near the starter motor. 


The rubber cap snapped off when trying to remove it.


Removal is super easy, remove the 7mm nut and lock washer. Place an oil pan under the bike as you'll have some oil loss.  This sensor takes a 14mm socket / wrench.


Looking kinda crusty.  Be sure to clean up the contacts if needed.


The sensor tip rubs against the shift drum, so after a while, it wears away.


The sensor is a direct swap, don't forget your copper washer.  I stuck my broken cap back on with a healthy dose of red RTV.

With the sensor replaced, I hooked up my wiring and tested it.  But, no luck. Time to bust out the wiring diagram.  When I wired the neutral and oil lights, I wired them as if they were normal lights, like the brights or t-signals.  These sensors are the opposite, the power is constant, and the ground is switched.  I'm sure there's a name for this but, it's not in my electrical knowledge base (UPDATE: switched ground).  On these, the power is fed via the Black/Brown wire, and the other wire is the ground.

I did my best to try and remove the wiring from the block but it failed.  I ended up needing to replace the Oil LED light and rewire the rest.  To say these wires are thin is an understatement.


Hooray!


The next garage session will either be wiring up the tail light, rear signals and plate holder, or the swing arm.   To be continued....

7.06.2020

Project CBR600F: Trackside Heated Grip Kit

Back in 2011, I installed a set of Kimpex heated grips on my XJ600.  Ever since,  I can't live without toasty digits at the flick of a switch. Installing the grips is simple, I used the same manner as shown in the XJ installation post.

Remove your old grips, install the sticky backed heat elements, secure them with a few rings of 1" heat shrink tubing.   On the left grip, you may want to put a layer or two of tubing under the heat element to balance out the feel since it is inherently cooler than the throttle side.  Route the wiring, leaving enough slack on the throttle side as needed.

To keep from accidentally killing your battery when you leave your grips on (and you will forget), you'll want to power the grips via relay and distribution block.  I used a 5 pole relay, wired as shown.


The 87 pole will route power to the block when the relay is energized, 87A will have power when the relay is powered down.  For my installation I used 87A and a ground feed to connect to my SAE charging wire. That way I save on wiring mess, connections to my battery and the charging port is "dead" when the bike is running. Pole 86 is fed from the taillight wire. Pole 30 will need a fuse between the relay and the battery.  My drawing of the power block is not really accurate as the terminals are separated horizontally, instead of vertically as I drew it. But you get the idea. For future expansion of farkles, I went with two separate blocks.  Many moons ago, a friend had a low speed get off.  Thankfully he was ok but his bike started acting strange.  Honking, lights flashing, loss of power, then back to normal.  We eventually got it into the garage and it turned out to be a loose ground due to all the goods stacked on it.  So, moral of the story, use distribution blocks.


This aluminum sheet will be replaced with ABS, molded to fit.


Both blocks nestled in their new homes.


Wrapped up with quality electrical tape to add a level of weather proofing. 


Lookin' good!


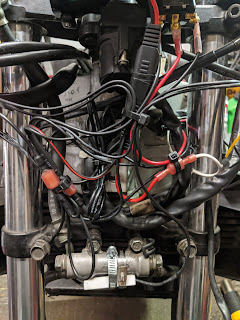
Find a suitable location for the switch ( I recommend buying a better quality switch with a water resistant cover). You'll need a SPDT (single pole dual throw) switch. For the CBR, I mounted the switch in the dash plate I fabricated.  The power feed connects to the middle pole.  Connect the wire with the resistor to one of the remaining poles, this is your HIGH setting.  The other is the LOW.  From here, select a wire from each element and connect both to the HIGH/LOW wire, single end.  The remaining wire from each element is for the ground.  Clean up your wiring and find a suitable location to mount the resistor. I used a hose clamp to mount to the brake block.  Is that the best? Maybe not, as it will get pretty toasty, so I may move it when I get my headlight assembly.

Definitely don't bundle it with wires unless you want to release the magic smoke from your harness.
My wiring is a bit messy as I'm also powering a USB power outlet on the backside of my dash plate.


I flipped the switch and was rewarded with warm digits. Hooray!

Update:

New ABS inner "fender" in place and distribution blocks attached with velcro strips.